Rigging Your Dipnet
Getting set up for dipnetting starts with deciding where you plan to dipnet. Nets for the Copper River can be completely different than a net you would use on the Kenai or the Kasilof. Do you plan to net exclusively out of a boat, or do you need a net that gives you the option of fishing from shore or a boat? Next, you need to look at your budget. Can you afford a couple hundred dollars for a premium setup, or will you need to build your own? Finally, a good working understanding of the different styles of hoops and rigging is necessary.

Hooligan Nets
Most hooligan nets are between eight and twelve feet long, and are made of thin-wall aluminum conduit. Some longer telescopic poles are available, which are advantageous in situations where the fish are found farther out from shore.
Salmon Dipnets
Generally speaking, a typical salmon dipnet consists of a hoop around 5' in diameter connected to a pole. Nets are available at many locations in Alaska, and there are a few regional differences that are unique to certain rivers. For example, many of the nets used on the Copper river are little more than salmon landing nets with really long handles. Nets used at the Copper River bridge may be as long as 40', whereas nets used on the Kenai or Kasilof may be quite a bit shorter. These differences are mostly an outgrowth of the conditions encountered on these rivers. Dipnets come in all sorts of configurations, from regular landing nets to short-handled boat nets, and specialized nets 30 or more feet in length used on the Copper and Kenai rivers. Here is an overview of what's available.
When the run is in full-swing, just about any net will do, and children can sometimes be seen netting fish with little more than a landing net, fishing between their parents and shore. But when fishing slows down, that's when you start to contemplate the subtle differences of net color, hoop shape and other factors discussed on this page.
Legal Requirements
A dipnet may be just about any configuration the user wants, as long as it meets the legal parameters. According to the Alaska Administrative Code (5 AAC 39.105(24)), a dipnet is defined as:
"a bag-shaped net supported on all sides by a rigid frame; the maximum straight-line distance between any two points on the net frame, as measured between any two points on the net frame, as measured through the net opening, may not exceed five feet; the depth of the bag must be at least one-half of the greatest straight-line distance, as measured through the net opening; no portion of the bag may be constructed of webbing that exceeds a stretched measurement of 4.5 inches; the frame must be attached to a single rigid handle and be operated by hand."
The Shape of the Hoop
Whether you save a few bucks by building your own, or if you purchase a net from a local vendor, you have a lot of latitude in meeting the legal requirements concerning hoop size and shape. You should have a pretty good idea what river you intend to fish, and whether or not you want the option of using the same net from a boat. Here are some options.
Round Hoop. This is, by far, the most common shape for a dipnet. Shore-based dippers use them with great success, and for boat dippers, it's the best option. So if you plan on using the same net for shore and for the boat, go with a round hoop.
D-Hoop. This style of hoop is popular on the Copper River, the Kenai, and the Kasilof. It's a round hoop with a flat side. The flat side is designed to rest on the river bottom, and because you have more surface in contact with the riverbed, this net is easier to hold in current than a round hoop.
Rectangular Hoop. Many home-built nets are rectangular, designed so the long side of the hoop rests on the riverbed. Fans of the rectangular nets reason that fish travel along the bottom, therefore a rectangular design that hugs the bottom contour will catch more fish. This theory does not always hold to be true, particularly with sockeye salmon, which will travel anywhere in the water column. Rectangular frames are easier to hold in place in heavier current, because you have more of the frame in contact with the riverbed. These nets are popular on the Kenai and the Kasilof, and they are seen on the Copper River as well.
Square Hoop. Not as popular as the rectangular hoop, some folks go with a square design in order to hold the river bottom in heavy current, while allowing the net to extend higher in the water column. A modification of this design is the square frame without a handle used by dip netters floating the river in dry suits.
Landing Net Hoop. This type of net is basically a landing net for large fish, with a very long (sometimes telescopic) handle. These nets typically use coarse mesh and larger bags. This is the most popular style of net used on the Copper River.
Modifications. Some nets include small projections off the bottom of the hoop that are designed to dig into the riverbed, so it can be held in heavier current. Hoops come in different diameters of hoop material. Hoops made of thinner material will not create as much drag in the current, but they may not be strong enough to resist bending. Some hoops are swaged, to give the tubing less drag in heavier current.
Pole Configurations
Hoop and Pole Construction. Dipnet poles are made of several materials, as follows.
- Light-weight aluminum tubing. This is used in lower-end salmon dipnets and in almost all hooligan nets. It is often ribbed or patterned to give it additional strength. Poles of this type used for salmon dipnetting will last only a few seasons before needing to be replaced.
- Wood poles. Some home-made nets are designed to float on the surface. These nets may use a floating wood pole and a rectangular net hoop. These nets are designed mostly for shallow water, however they catch fish in deeper water as well, especially when fish are milling around during slack tide.
- Steel electrical conduit is used in many commercially-produced poles. It can be sleeved to increase the length, however it is not strong enough for nets over 20 feet in length.
- Aluminum pipe is the most common material used in the higher-end nets. The pipe is sold in twenty-foot lengths, however for ease of transport, pole sections are usually ten feet long. Aluminum pipe works well for nets out to thirty feet in length. After that, it becomes too limber to control, and difficult for one dipnetter to handle alone.
- Aircraft-grade aluminum tubing. This is a very light and strong material, but expensive. It works very well for extremely long nets in the 30-40 foot length.
Telescopic Poles. Some nets are made with a telescopic pole, using a push-button system to deploy the pole. These nets use thin-wall aluminum tubing and will not withstand heavy current for long. If you're fishing slow back-eddies or other calm water, this type of net can get you on the water.
Swaged Poles. Some poles are made of steel electrical conduit. The method used to secure pole sections together is to swage one end of the pole, similar to the 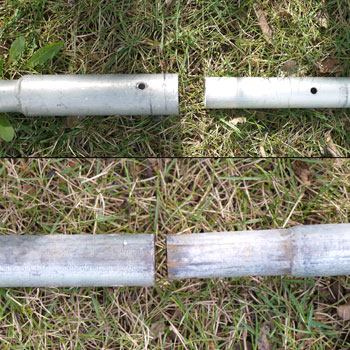 ferrules on a fishing rod. This allows pole sections to be joined by slipping the ends together. This is a strong bond on nets up to 16-20 feet in length, but once you start adding more pole sections, the whole system develops a wobble that makes noise underwater.
Ferrule System. Most commercially-produced dipnet poles use a ferrule system to secure pole sections together. This is accomplished one of two ways. The first method uses a sleeve of larger-diameter pipe that covers the joint. The sleeve is welded to one pole section, the next pole section slips inside the sleeve, and is held in place with a bolt. The second system is similar, but the sleeve goes inside the pipe and is bolted in place at each end. Either system is effective, and there are no real issues with either way.
Pole Length. The length of the pole depends on where and how the net will be used. Boat-based dippers will find that a pole over six feet long may become too large to handle in and out of the water. This is because the net is usually rigged with a rope tied off to the bow of the boat, to keep the net from being swept toward the stern as the boat moves forward. Therefore it is necessary to be able to get the hoop of the net into the boat without untying the rope. Longer handles get in the way. Shore-based dippers can get by with much longer handles if the current allows it. In places where the current speed changes during the day, such as the tidewater areas of the Kenai, the Kasilof, and Fish Creek, a net with add-on pole sections can offer a tremendous advantage. In its longer configuration, it places the hoop farther out in the river away from neighboring nets. This decreases your chances of getting blocked by nearby nets, increasing your chances of catching fish. Shore-based dipnets start out around 16' in length and go up from there, with some really large poles of 40' or more found on sections of the Copper River. These larger nets sometimes require a second person in the middle, when repositioning the net in conga line situations. They usually require floats at the hoop end, to keep the net vertical in the water.
Marking Pole Sections. On all multiple-section poles, pins or bolts are used to secure each pole section to the previous one. Because the bolt holes are not usually 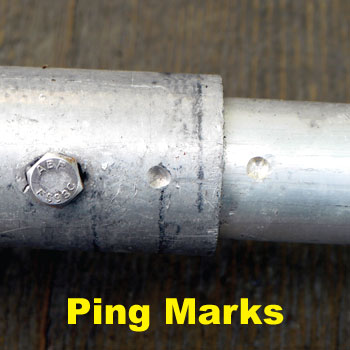 drilled on a precision jig, variations in the hole placement and lineup will occur. If you put the wrong sections together, the holes will not line up and it will be impossible to assemble the pole. Immediately after drilling the bolt holes, use a center punch to "ping" corresponding pole sections, so you know which sections go together. It will save you a lot of setup time. Ping the first joint once on each adjoining section, near the joint. Ping the next section twice, and so on.
Are You a Do-It-Yourselfer? You can purchase the aircraft-grade aluminum pipe stock at Reeve Airmotive in Anchorage.
D-Handle, Tee-Handle, or Hoop? The shape of the handle is important because it gives you control of the net. This is especially relevant with shore-based dipnetting on rivers with heavy current, where you may need extra leverage to keep the net upright and against the bottom. D-handled nets are popular on the Copper River, however in those cases additional leverage is needed. This is accomplished by installing an additional grab handle a few feet down the pole from the end. On the Kenai and Kasilof Rivers, a hoop-shaped handle is often used, or a tee-handle. Hoop handles are common on mass-produced nets that are available from some of the big-box stores, whereas tee handles are most often available on custom produced nets. One advantage of a tee handle is that extensions can be added to the handles when additional leverage is required. Simply slip a couple of three-foot sections of steel conduit over the handles and you'll have all the leverage you need.
A number of welding shops make dipnets specifically for Alaska, and they do a brisk business during the season. These nets are usually more expensive than nets available at outdoor stores, however they offer features not found anywhere else and the quality is usually superior. They can also offer custom work as needed, such as additional pole sections, additional bracing for the hoop and so on. Some offer swaged hoops, for less drag in the water, handles of various lengths, interchangeable handles for boat or shore use, and different-sized hoops. Hoops are often made removable from the handle, for ease of transport.
A Word on Hardware
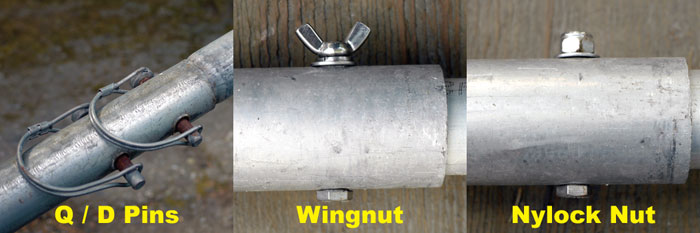
Hardware used to secure pole sections together may consist of quick-disconnect pins, or nuts and bolts, or wingnuts and bolts, depending on user preference. Hardware should be taped to prevent the net from snagging on it, or, in the case of shore-based dipnetters working in close quarters with other dippers, snagging a neighbor's net. Therefore, quick-disconnect pins are larger and more difficult to fully tape than nuts and bolts. Wingnuts and bolts work well, and don't usually require tools to assemble, however they should be rigged using lock washers to prevent the wingnut from loosening by itself and falling off. Loose hardware can result in a lost net section. All hardware should be stainless steel, to prevent corrosion. It should be noted that steel hardware can eventually enlarge the holes drilled in the pole sections, particularly if the poles are made of softer aluminum.
Hardware Pros and Cons
Quick-Disconnect Pins 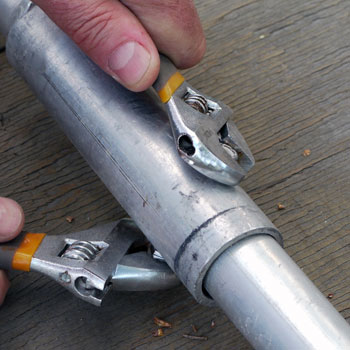
Pros: Fast assembly / disassembly, no tools required.
Cons: Can prematurely wear out pre-drilled holes in dipnet pole, higher profile and requires taping.
Nuts and Bolts
Pros: Solid setup, not likely to wear out predrilled holes in pole.
Cons: Protruding bolts require taping to avoid snagging nets, hardware can back itself off, requiring periodic inspection for looseness, wrenches required on both the nut and the bolt.
Nylock Nuts and Bolts
Pros: Solid setup, not likely to wear out predrilled holes in pole, Nylock nut will not back itself off, wrenches required.
Cons: Protruding bolts require taping to avoid snagging nets, hardware can back itself off, requiring periodic inspection for looseness.
Wingnuts and Bolts
Pros: Solid setup, not likely to wear out predrilled holes in pole.
Cons: Protruding Wingnuts and bolts require taping to avoid snagging nets, hardware can back itself off, requiring periodic inspection for looseness. Tools required for snug fit.
Acorn Nuts and Bolts
Pros: Solid setup, not likely to wear out predrilled holes in pole. Low profile of acorn nut may eliminate need for taping hardware.
Cons: Hardware can back itself off, requiring periodic inspection for looseness.
Hardware Tip: If you're using a nut and bolt setup with regular nuts, nylocks, wingnuts or acorn nuts, use lock washers to keep your hardware from backing itself out during use. You don't want to lose the end of your net!
The Net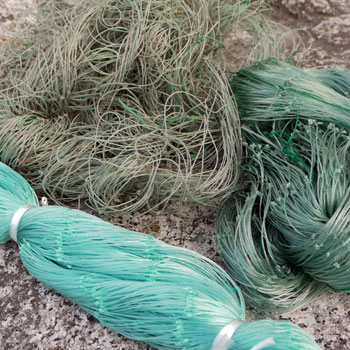
Does the color of your net make a difference? Some dipnetters believe it does. Whether or not that's true, or is merely idle speculation borne of fishless hours of contemplation on the river is for the reader to decide. That said, there are many documented instances where individuals using nets of one color or thread diameter outfished neighboring dippers at the rate of five or six fish to their one. Clearly, there is something to this. In the Kenai and Kasilof rivers, go with a translucent green netting material of the same diameter that the drift netters use in Cook Inlet. You can't go wrong. Avoid the lighter blue net material, or netting of a larger diameter. Larger diameter netting makes a lot of noise in the water, the fish can sense it, and they move away. Of course, if the river is plugged with fish, it makes little difference as you will catch fish anyway.
Special Nets for Drifting
A few adventurous dipnetters don wetsuits or dry suits, and swim fins, and do their dipnetting while floating down the river. This method has gained a certain popularity on the lower Kenai River. Nets for this purpose have no handle other than the hoop itself. The hoops are often made of PVC pipe and are square or rectangular. These light-weight setups can be very effective, however the practice can also be very dangerous. Some swimmers have had to be rescued by the Coast Guard, as they were being swept out to sea.
Gillnet versus Landing Net
Certain nets seem to be more productive or more practical on certain fisheries. Gill net material is very popular on the Kenai, the Kasilof, and Fish Creek. These rivers have muddy or sandy bottoms, which allow larger net hoops and finer mesh gill net material, as the net does not become snagged on riverbottom structure. You have the added advantage of catching fish by the gills, so you lose fewer fish. On the other hand, Copper River dipnetters seem to prefer a large D-shaped landing net with a very long handle. The landing net material does not snag on the rocky river bottom, reducing the chances of losing your net.
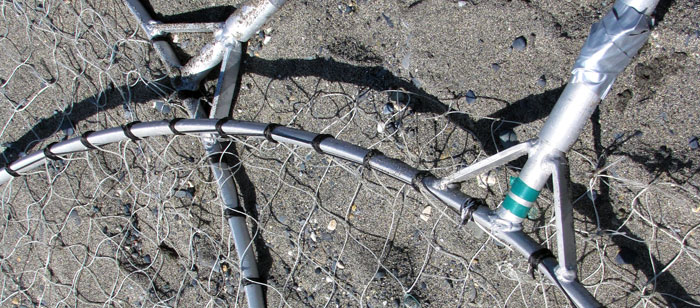
Protecting the Net
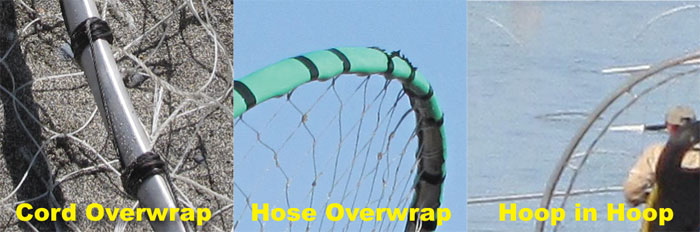
Depending on the river you're fishing, you may need to protect your net from abrasion between the hoop and the riverbed. If the net is simply laced to the pole with cord, the cord will eventually wear through because of abrasion against rocks in the riverbed. The amount of protection you need depends mostly on where you are fishing. If you're fishing out of a boat, you probably don't need anything, because your net will rarely contact the bottom. But if you're a shore-bound fisher on the Copper River, the rocky bed of the river will tear your net up in a few short hours if you don't protect it from damage. You can usually get by on the Kenai, the Kasilof, and Fish Creek, because the bottom of those rivers is mostly sand or mud. Even so, protecting your net means you spend more time fishing and less time repairing your gear. And as the saying goes, "you can't catch fish unless you're fishing". There are several ways to protect your net, as follows:
Cord Over-Wrap
One common method is to wrap 550 cord or even braided dacron ground line around the hoop as you secure the net. The trick to this method is to tie the cord to the hoop every few inches, otherwise if it wears through (and it will), the whole thing will come unraveled.
Garden Hose
Split a length of garden hose of the same diameter of your hoop, and slip it over the hoop, covering the lacing that secures the net to the hoop. Secure the garden hose with a 550 cord over-wrap or use zip ties to secure it. The downside of this method is that it effectively increases the diameter of your hoop, which creates more drag in heavy current.
Hoop Within a Hoop
Some dipnet hoops are manufactured with a smaller hoop just inside the outside hoop. The net is secured to this inner hoop, which completely protects it from abrasion. The downside of this setup is that it increases drag in heavy current, increases the weight of the hoop, and it costs more money.
Conclusions
In an afternoon on the river during the peak of the dipnetting season, you will see many different types of nets and many ways to rig them. Watch the way other dippers rig up and ask questions. You will learn many new things that will make you more effective, more efficient, and help you enjoy the experience much more fully. And who knows? You might find another fishing partner!
Need More Information About Alaska Dipnetting?
We've got you covered! Check out the Dipnetting Menu on the left side of this page, or click one of the links below for more information.
Alaska Salmon Run Charts | Dipnetting Intro | Dipnetting Gear | Dipnetting Techniques | Caring for Your Catch
Dipnetting Locations
Check out the following links to the various dipnetting locations in Alaska.
Copper River | Kasilof River | Kenai River | Fish Creek | Susitna River | Twentymile River